Working with Teaming
Teaming offers two types of workspaces in which the components listed below are available:
personal workspaces and workspaces for the working groups
- each team member has their own personal workspace, which is located under "My workspace"
- each workgroup has its own workspace in the "Teams" folder (i.e. the team of this workgroup).
Browser support
Chrome: 104 or higher
Chrome Mobile: 104 or higher
Edge: 118or higher
Firefox: 112or higher
Firefox Mobile: 112or higher
Safari: 15.9or higher
Safari Mobile: 15.9or higher
Java Script
JavaScript must be activated for Teaming to work optimally with all functionalities. This means that it is usually sufficient if JavaScript is installed and active on the computer.
The read and edit rights in Teaming are assigned by the Web Requirements and Services team when a team is created. In exceptional cases, it may make sense for a team to be visible to all users with all its components, or for a team not to be visible at all. In these cases, please contact WAD.support@klinikum.uni-muenchen.de.
Default setting
-
PUBLIC -which is necessary so that potential team members have the opportunity to identify the team leader and apply to join the team.
The content that is created there (e.g. files or photos that are uploaded) can also only be read by team members.
After logging in for the first time, you will start in your workspace. Only you can see this workspace. If you want others to be able to see your personal data, you must change the access rights.
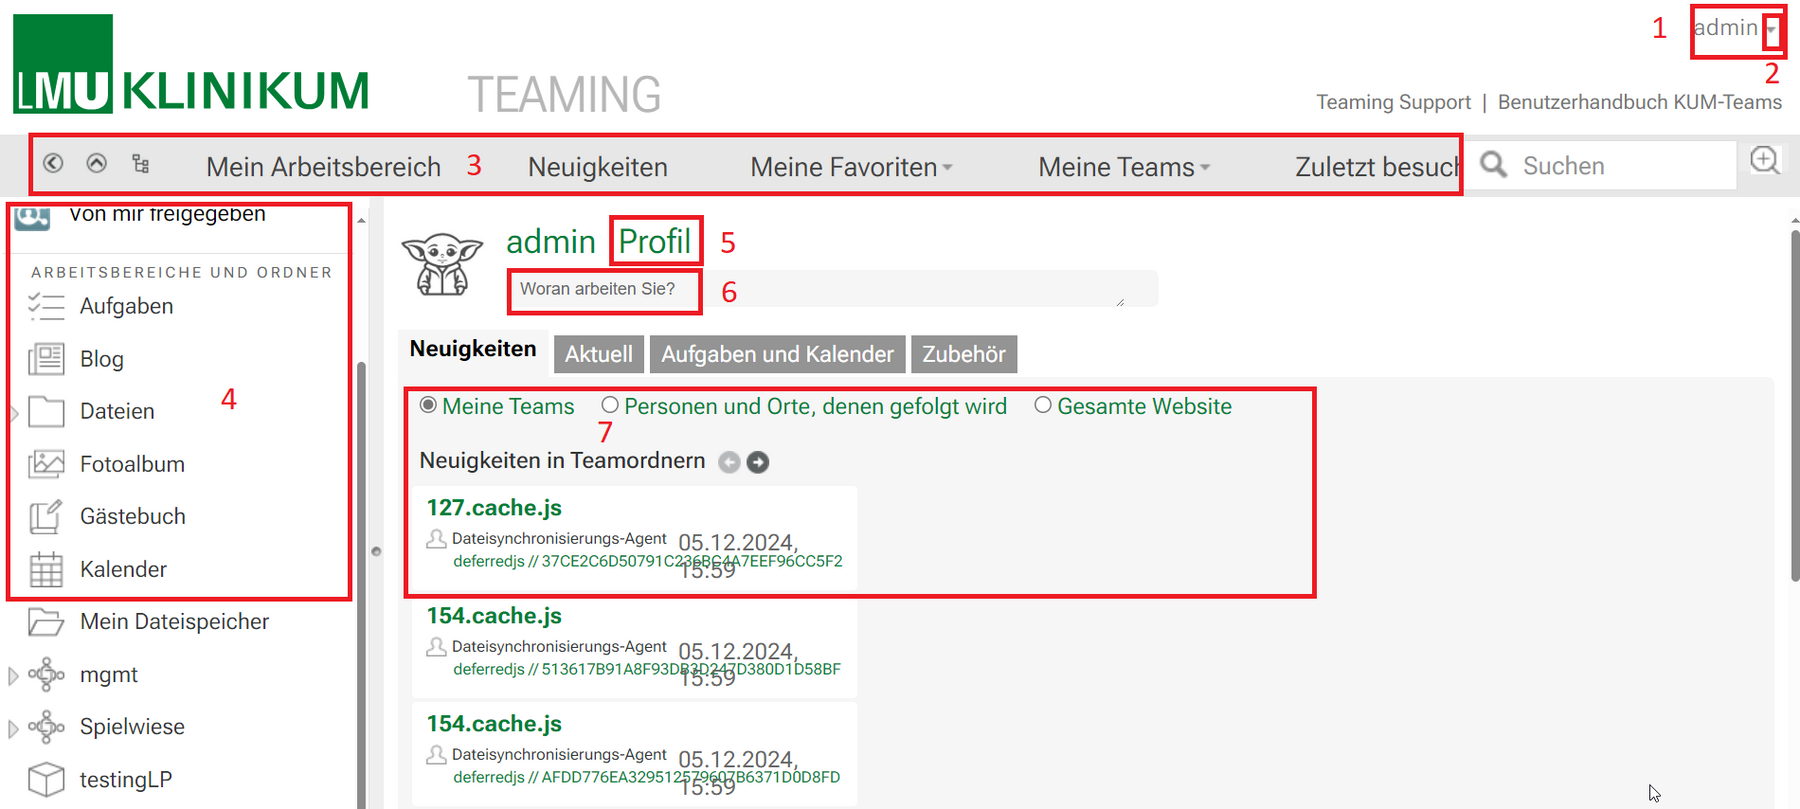
- My user name
- General functions, e.g. logout or help
- Menu bar
- My personal workspace
- Open my profile
- Microblog
Describe what you are currently working on in a maximum of 255 characters. In order for your content to be seen by others, you must grant them reading rights. - My start area: news from my teams, for example, is displayed here.
You can find your teams under "My teams" in the menu bar. If you are not yet a member of a team, you can join a team.
Start with Teaming
Here you will find all the points that will make your start at Teaming easier.
For employees of the clinic
Employees of the LMU Klinikum can use the HELIOS ID with the"external password" to use Teaming.
The HELIOS ID with external password is always set up for every employee of the hospital. If you do not know your ID, you can reset your password in the IT portal at any time after logging in under the menu item "CHANGE EXTERNAL PASSWORD".
Access / account to Teaming must also be activated via the IT portal after logging in under the menu item "ROLLS" and will then be available after approx. 6 - 8 hours.
Teaming can be accessed via the URL https://teaming.med.uni-muenchen.de.
An adapted interface for access from mobile devices can be found at https://teaming.med.uni-muenchen.de/mobile.
For external members / cooperation partners
The responsible team leader invites you to teaming.
To do this, click on the "Share this workspace" button and enter the e-mail address of the new external member in the field that appears. Confirm the entry with the Enter key and then click on the "OK" button.
The external member will then receive an e-mail with a registration link. The external member enters their first name/last name/password, receives a double opt-in e-mail and activates the new account via a link. The login name is the e-mail address.
Once registration has been successfully completed, you can add the new member to your team as a team member.
- Write an e-mail to WAD.support@klinikum.uni-muenchen.de with the subject "I would like to use teaming" and let us know the desired title of the team. At least one employee of the clinic must be in the management of each team.
- We will create the desired team for you within three working days and give you administration rights for your team.
- You will receive an e-mail as soon as your teaming area has been created. From this point on, you will find your team under the"My teams" button. You can now customize the team layout, delete the components that you do not need and add members.
- As a team leader, you are automatically a member of the administration team for all team leaders.
Components of a team: overview, add, delete
Team overview
The following components are available in Teaming:
- File Depot
- Discussion forum
- blog
- task management
- calendar
- wiki
- Polls
- Photo album
- Guestbook
Adding components at a later date
Would you like to have additional components at a later date? Please send an e-mail to WAD.support@klinikum.uni-muenchen.de and tell us informally
- the name or URL of your team
- Number and type of additional components
Why can't I add components myself?
Assigning read and write permissions for subsequently added components is complex and requires detailed knowledge of the permissions system in Teaming. For this reason, we have not released this function for team leaders.
Delete a member
You can find instructions on how to delete folders under Delete folder under the heading "Other Teaming functions".
You know the team leader

Contact the team leader by e-mail. As an external cooperation partner, you must also enter your user ID for Teaming. Once you have been accepted into the desired team, log in to Teaming. You will then find your team under "My teams".
You do not know the team leader
Find a team via the search
If you know the team name, you can find the team using the search function.
The team leaders and a contact option are listed in the team header. Contact the team leader by e-mail and enter your user name for Teaming. Once you have been added to the desired team, log in to Teaming. You will find your team immediately under "My teams".
Find a team via the hierarchy

Use the "Browse hierarchy" button in the left-hand navigation to open the overview of all teams ("Workspaces").
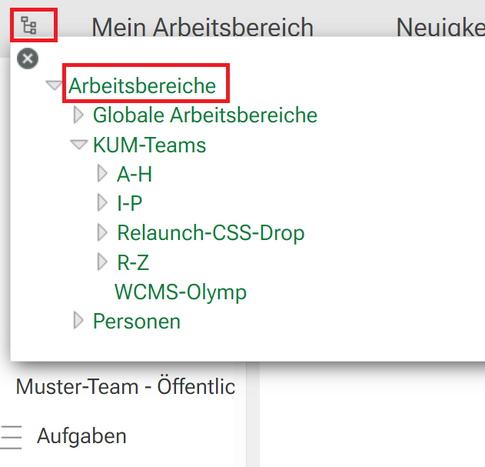
1. button "Search hierarchy"
2. click on "Workspaces"
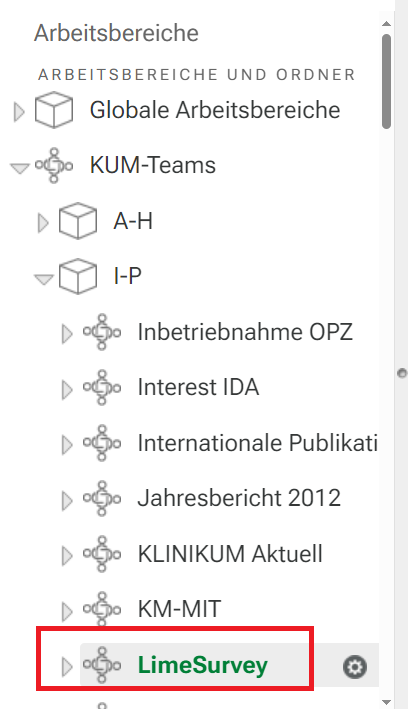
Example team in the hierarchy: An overview of all teams ("Workspaces") opens in the left-hand navigation. You will find your team under Teams in the alphabetical list.
Our example is the "LimeSurvey" team with the path:
KUM-Teams > I-P > LimeSurvey
The team leader and a contact option can be found in the team header. Contact the team leader by e-mail and enter your user ID for teaming.
Once you have been added to the desired team, log in to Teaming. You will find your team immediately under "My teams".
You cannot find a team
The MIT "Web Requirements and Services" team creates all teams initially. Please contact us by e-mail if you cannot find a specific team.
Navigate to your team, e.g. via the "My teams" button. Click on "Workspace" in the menu bar and select "Edit team".
Add or delete team members
You can add to your team:
- Add team members
- Delete team members
Via Workspace > Gear > Edit team you will receive a list of all team members.
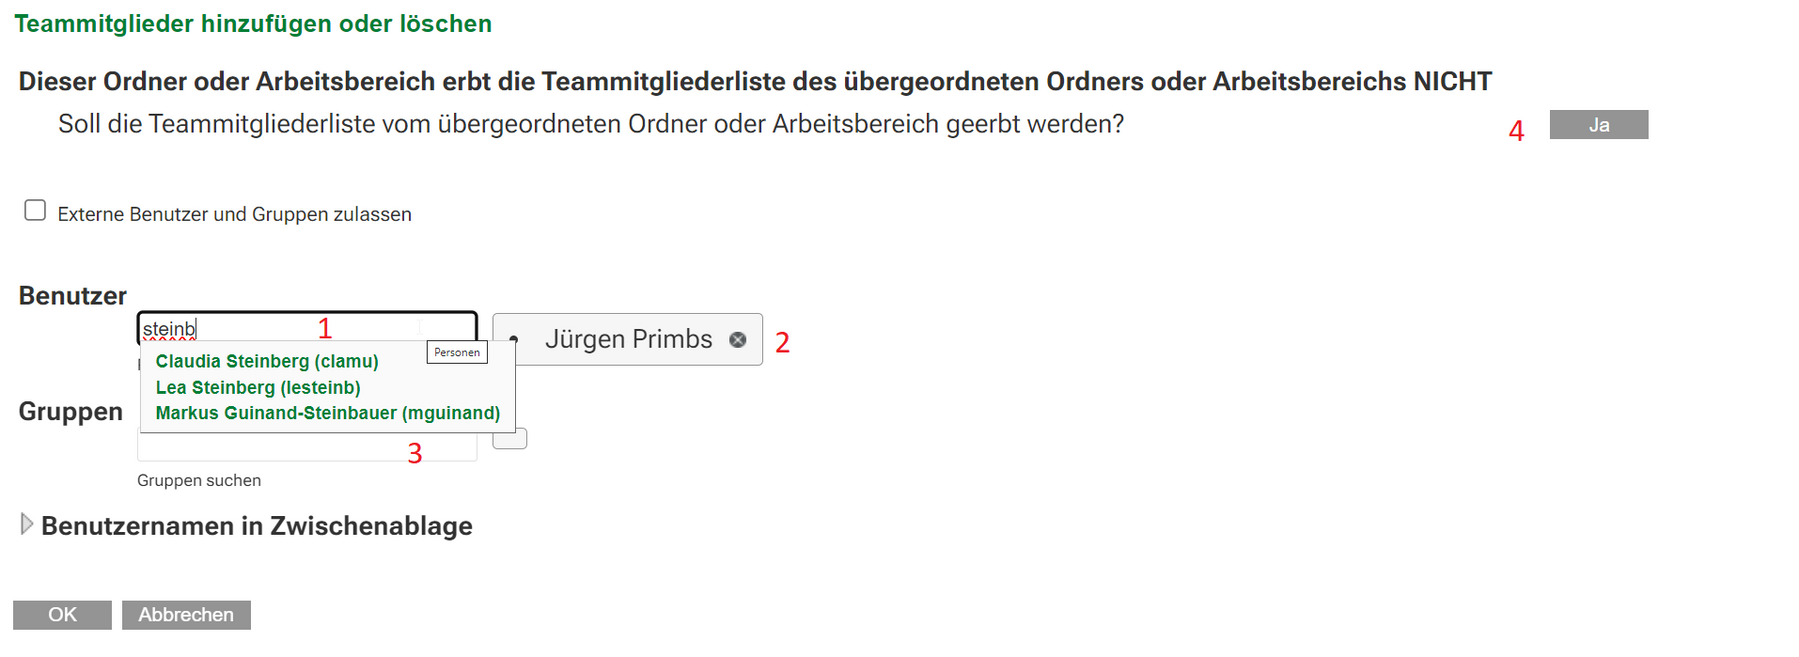
- Add team member
To add a team member, enter their HELIOS ID or the ID we have assigned for external members in the "User" field. After the first few letters, a selection of all users with a similar name will automatically appear. Select "your" user. The prerequisite is that "your" user has already activated their HELIOS ID for teaming via the IT portal or the ID for external members has already been set up. - Delete team member
You can delete any existing team member via the X. - Add or delete groups
This is currently not possible. - Inherit rights
Click "Yes" to delete your list of team members and inherit the team list of the parent folder. This only makes sense for subfolders and is the default setting there.
Do not click "Yes" at the start level of your team under any circumstances. Your team list would be irretrievably deleted.
Show team members
You can display a list of all team members via Workspace > Show team.

Add or delete users for team management
Any number of users can be members of the team management. External users can also be team leaders as long as at least one member of the team leader is a member of the LMU Klinikum with a regular HELIOS ID.
Please contact WAD.support@klinikum.uni-muenchen.de to add or delete additional users to the team management.
I cannot activate my ID for Teaming
The Web Requirements and Services team will activate the HELIOS ID for Teaming for all team leaders. You can log in to Teaming directly as soon as we have created your team and informed you by e-mail.
Can the team leader consist of several people?
As long as one member of the team leader is a member of the LMU Klinikum, there can be as many additional team leaders as required. Please contact WAD.support@klinikum.uni-muenchen.de with your request for an additional team leader.
Why can't I move folders or teams?
The control of access rights is very complex and must be carried out each time the folder structure is moved. As there is a great potential for error here, only admins can move folders or teams. Please contact the MIT Web Requirements and Services team.
Who can create a team in Teaming?
All employees of the LMU Klinikum may form teams to work together in research, teaching and administration. At least one member of the LMU Klinikum must always be in the leadership of a team.
How many teams can I create in Teaming?
There is no limit as long as each individual team is used sensibly.
How many members can a team have?
There is no numerical limit.
How much storage space is available?
The team leader has 500 MB of storage space available for data. If you require more storage space, please send an e-mail to WAD.support@klinikum.uni-muenchen.de.
Working with the text editor
In Teaming it is possible to edit texts in some places. Only the text editor (TinyMCE) is used for this purpose. You can use this to easily edit and format texts and integrate links and images.
Toolbar
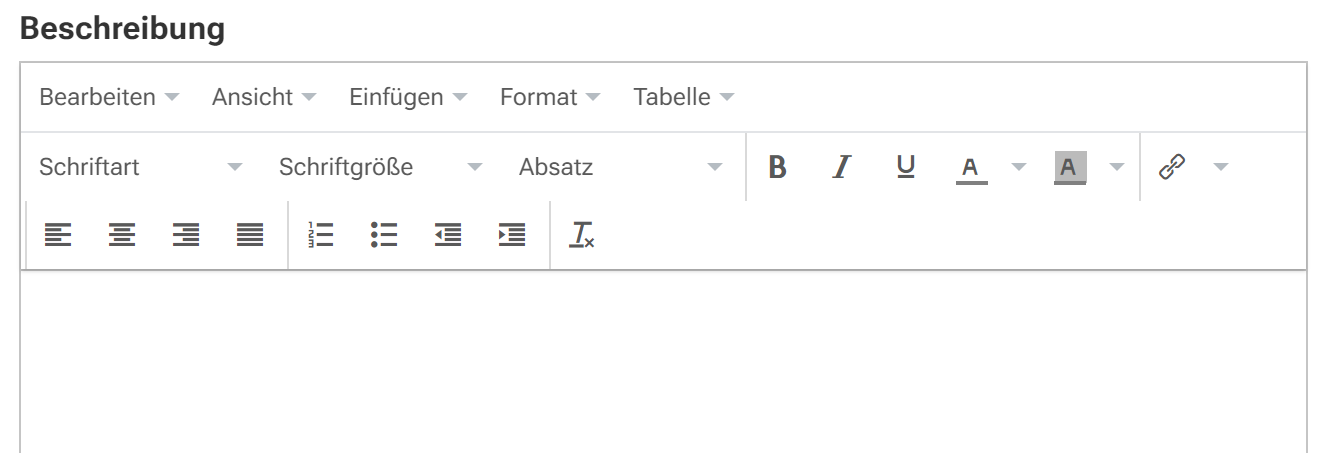
Tips
- Link anchor
Insert link > Address: http://beispielseite.de#Ankername; Window: Open new window - Link anchor on the same page
Insert link > Address: #Anchor name; Window: Open in same window - Insert
Via Insert --> Image/ Medium/ Link/ Special characters/ Table: various media are inserted
I have forgotten my password
- Employees of the hospital
The external password for the HELIOS ID can be reset via the IT portal - external cooperation partners:
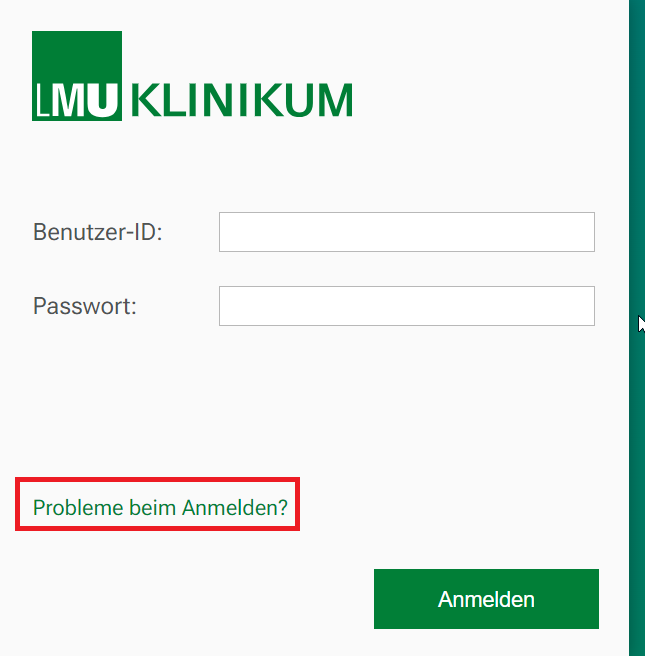
Click on the "Problems logging in" button on the Teaming login page.
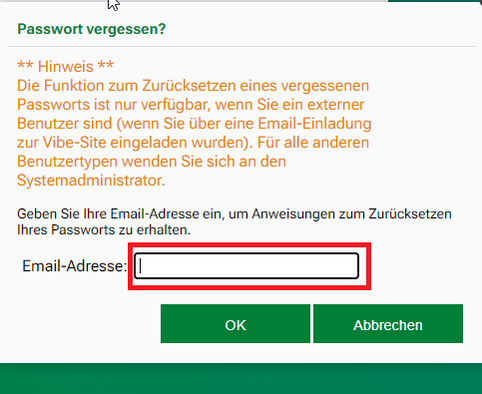
Enter your e-mail address in the corresponding field and click on "OK". You will receive an e-mail with further instructions on how to reset your password. This only applies if you have an external account.
I do not yet have an ID for Teaming
see Request identifier for teaming
I cannot log in to Teaming
Before logging into Teaming for the first time, you must have your Teaming ID activated in the IT portal.
How do I change the language settings?
Open the editing of your profile via Profile > Edit. You can change the language settings in the "Country settings" tab.
How can I join a team?
See "Become a member of Teaming".
How do I upload several pictures at once to a photo album?
You can use the "Add photos via "Add files" function to add several images to your photo album at once.
How much storage space is available?
Team members have 100 MB of storage space available for data.
Working with the text editor
In Teaming it is possible to edit texts in some places. Only the text editor (TinyMCE) is used for this purpose. You can use this to easily edit and format texts and integrate links and images.
Toolbar

Tips and tricks
- Link anchor
Insert link > Address: http://beispielseite.de#Ankername; Window: Open new window - Link anchor on the same page
Insert link > Address: #Anchor name; Window: Open in same window Insert link
Via Insert --> Image/ Medium/ Link/ Special characters/ Table: various media are inserted
I have forgotten my password

Click on the "Problems logging in" button on the Teaming login page.

Enter your e-mail address in the corresponding field and click on "OK". You will receive an e-mail with further instructions on how to reset your password. This only applies if you have an external account.
Can I create a team in Teaming?
Only a member of the LMU Klinikum (employee or enrolled student) with a regular HELIOS ID can initiate the formation of a team. As an external cooperation partner, you can become a member of the team management, with full team management rights.
How do I get access to Teaming?
Please ask your team leader for a regular HELIOS ID in advance. If you do not have/can not obtain a HELIOS ID, we will issue you with an external team access for teaming. This applies to external cooperation partners who do not work or are not enrolled at the LMU Clinic.
How can I join a team?
See"Becoming a team member in Teaming"
Other Teaming functions
Teaming is based on a powerful product (Microfocus Vibe). A few advanced functions are explained here. Please note that our support is limited to the creation of a team and the configuration of access authorizations.
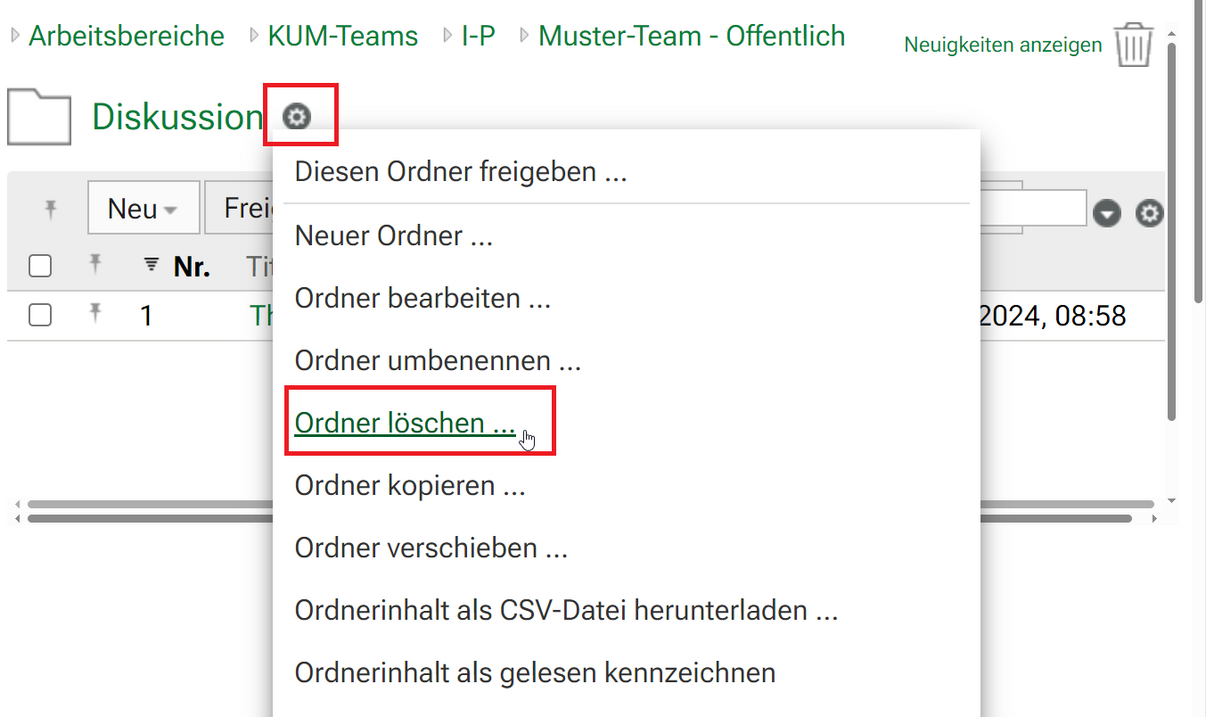
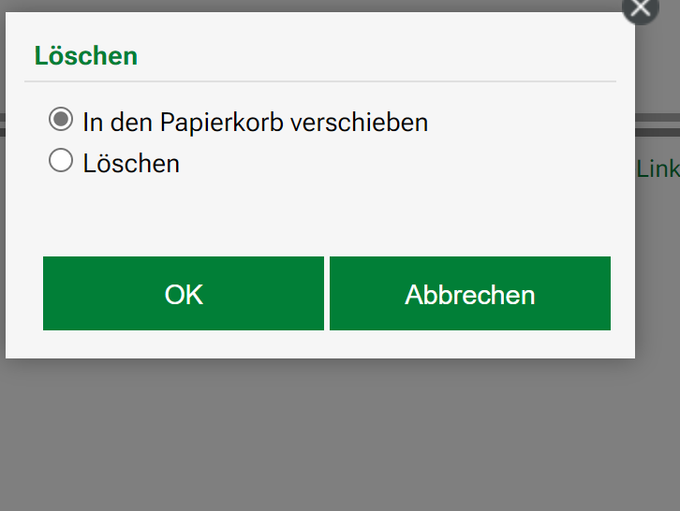
Click on the component in your team that you want to delete. In this example, this is the "Discussions" folder. You can delete the selected component via Workspace > Delete folder.
You must confirm the deletion process once again.
Either you move the folder to the recycle bin --> it can be restored from there
Or you delete the folder completely --> then it is permanently deleted and cannot be restored.
If you would like to delete your entire team, please contact WAD.support@med.uni-muenchen.de.
I want all team members to have full read and write access
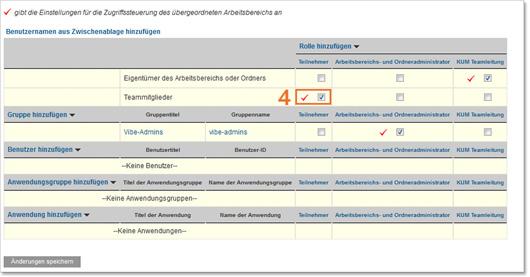
- Select your team via "My teams".
- In the left-hand navigation bar, select the folder for which you want to change the access rights (e.g. Blog, Files or Wiki).
- Start the access control via Folder > Access control.
- Place a tick in the "Team members" row and the "Participants" column.
- Confirm the changes with "Save changes".
- Close the window using the "Close" button. top
I would like all team members to have read access
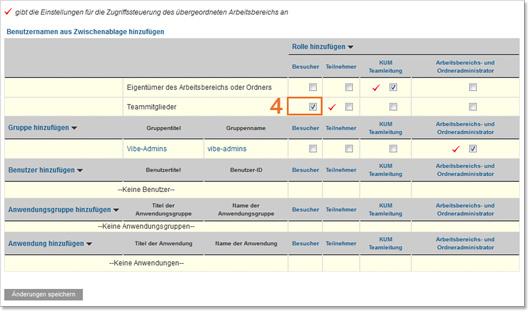
- Select your team via "My teams".
- In the left-hand navigation bar, select the folder for which you want to change the access rights (e.g. Blog, Files or Wiki).
- Start the access control via Folder > Access control.
- Place a checkmark in the "Team members" row and the "Visitors" column.
- Confirm the changes with "Save changes".
- Close the window using the "Close" button.
I want individual team members to have full read and write access and the remaining team members to have read-only access
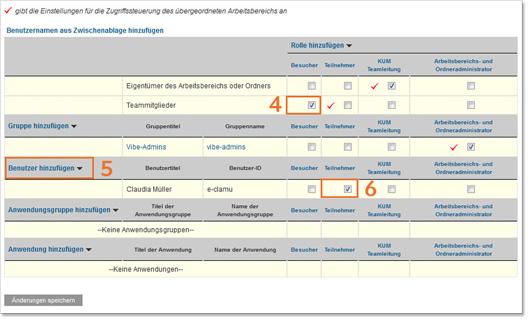
- Select your team via "My teams".
- In the left-hand navigation bar, select the folder for which you want to change the access rights (e.g. Blog, Files or Wiki).
- Start the access control via Folder > Access control.
- Place a checkmark in the "Team members" row and the "Visitors" column.
- Now add the team members who should have full read and write access via the "Add user" link.
- In the line with the name of the respective user, place a tick under "Participants".
- Confirm the changes with "Save changes".
- Close the window using the "Close" button.
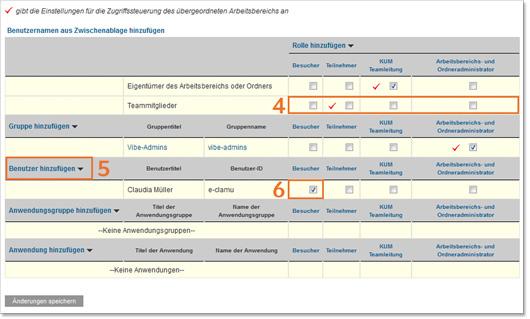
I want individual team members to have read access and the other team members not to be able to see the folder
- Select your team via "My teams".
- In the left-hand navigation bar, select the folder for which you want to change the access rights (e.g. Blog, Files or Wiki).
- Start the access control via Folder > Access control.
- Remove all checkmarks in the Team members line.
- Now add the team members who should have read access via the "Add user" link.
- In the line with the name of the respective user, place a tick under "Visitors".
- Confirm the changes with "Save changes".
- Close the window using the "Close" button.
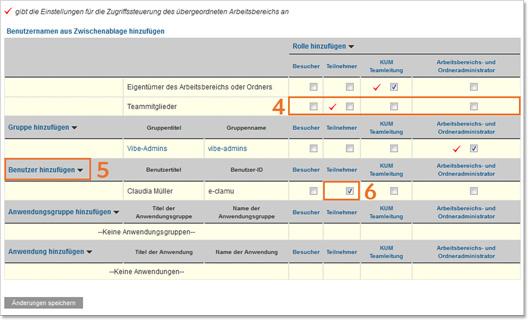
I want individual team members to have full read and write access and the other team members not to be able to see the folder
- Select your team via "My teams".
- In the left-hand navigation bar, select the folder for which you want to change the access rights (e.g. Blog, Files or Wiki).
- Start the access control via Folder > Access control.
- Remove all checkmarks in the Team members line.
- Now add the team members who should have read and write access via the "Add user" link.
- In the line with the name of the respective user, place a tick under "Participants".
- Confirm the changes with "Save changes".
- Close the window using the "Close" button.
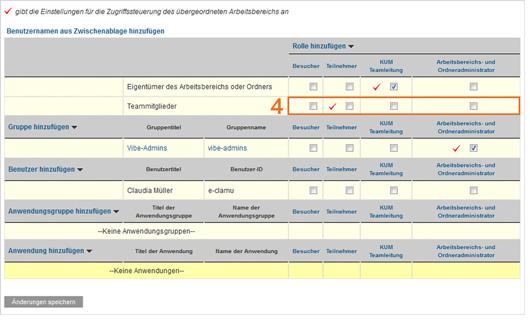
I don't want anyone but myself to be able to see this folder
- Select your team via "My teams".
- In the left-hand navigation bar, select the folder for which you want to change the access rights (e.g. Blog, Files or Wiki).
- Start the access control via Folder > Access control.
- Remove all check marks in the Team members line.
- Confirm the changes with "Save changes".
- Close the window using the "Close" button.
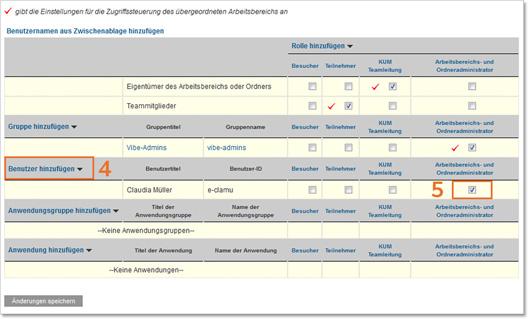
I would like individual members to have administration rights to individual folders
- Select your team via "My teams".
- In the left-hand navigation bar, select the folder for which you want to change the access rights (e.g. Blog, Files or Wiki).
- Start the access control via Folder > Access control.
- Add the individual members to whom you want to assign administration rights via the "Add user" link.
- In the line with the name of the respective user, place a tick under "Workspace and folder administrator".
- Confirm the changes with "Save changes".
- Close the window using the "Close" button.
Working with WebDAV
With WebDAV (Web-based Distributed Authoring and Versioning), files can be edited together in Teaming. The individual versions of a file are recorded and older versions can be reactivated. This makes it possible to track who has made which contribution to a document.
Configuring folders for WebDAV

Select the "Files" folder in your team. Select Folder > Edit folder. Check the box "All files loaded into this folder must have unique names. (You must check this box to access the folder contents via WebDAV.)".
Editing files with WebDAV
You can edit a file directly in Teaming and thus create a new file version. This is the standard procedure for editing documents together.
Open file editing.
Select the file that you want to edit directly in Teaming.

- A login window opens, you must log in again.
- Edit the file in a suitable program (e.g. Microsoft Word, Open Office, etc.).
- As long as you are editing the file, it is locked and cannot be edited by other team members.
- Click on "File > Save" in the editing program (e.g. Microsoft Word, Open Office).
- Saving creates a new version in the Teaming files folder, which only becomes visible after updating.
Version overview of a file
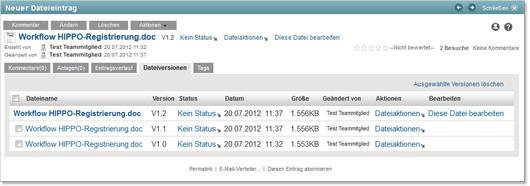
In the folder for files, each document has a unique name. If you upload a file with an existing name via "Add files", a new version is created.
You can open and view the individual file versions by clicking on them. However, you can only ever edit the latest version in Teaming.
Upgrading versions
If an older file version is to be made the current working version, there are two options:
- In the "File versions" area under "File actions", select "Upgrade this version to current version".
- In the "Entry history" area, select "Upgrade to current".
In both cases, the selection must be confirmed on a subsequent page. You can then continue to edit this version.

The Web Requirements and Services team creates a short URL for each new team. We will inform you of this by e-mail and you will also find it in the header area.
If you would like to have a different short URL, please contact WAD.support@klinikum.uni-muenchen.de. We will be happy to set up a different short URL for you.
What are tags?
Tags are keywords that
- workspaces
- entries
- folders
to specific categories. In Teaming, you can use the tagging function to create virtual containers for workspaces, entries or folders. This allows you to categorize information and quickly retrieve it later using these tags.
What is the difference between personal and community tags?
Personal tags
These tags are for your personal use only. Only you can use and display a personal tag.
Community tags
These tags can be used and displayed by anyone, provided that the person has the authorization to display the respective workspace, entry or folder.
Example
How do I add tags to workspaces or folders?
- Select the workspace or folder that you would like to tag.
- Click on "Workspace" in the toolbar and then on "Tag this workspace". Similarly, click on "Folder" and then on "Tag this folder".
- In the "Personal tags" or "Community tags" section, enter the name of the tag in the field. The "Enter and search" function applies to this field. If a tag with the desired name already exists, the full name will be displayed in a drop-down list after just a few letters have been entered. However, if the name is not displayed automatically, you can create a new tag using this process.
- Click on "Add" and close the window with "Close". The workspace or folder is now labeled with the specified tag.
How do I add tags to entries?
- Select the entry that you would like to tag.
- Click on "Tags" in the selected entry.
- In the "Personal tags" or "Community tags" section, enter the name of the tag in the field. The "Enter and search" function applies to this field. If a tag with the desired name already exists, the full name will be displayed in a drop-down list after just a few letters have been entered. However, if the name is not displayed automatically, you can create a new tag using this process.
- Once you have entered the full name or selected an existing one, you can then click on "Add" and "Close". The entry is now labeled with the specified tag.
How do I search for tags?
In Teaming, you can search for all workspaces, folders or entries that have been marked with a specific tag.
- To do this, click on the icon for the search options. The "Search options" dialog box opens.
- Select "Tags".
- Enter the name of the tag you want to search for in the search field.
- Select the desired tag from the drop-down list. Teaming will then show you all locations and entries that have been marked with the corresponding tag.

A permalink is a permanent link to a specific subpageof Teaming. You can create a permalink to any subpage by clicking on "Permalinks".

From this moment on, the generated permalink is displayed at the end of the subpage. You can send this permalink to team members by e-mail, for example, to direct them to a specific page.

