Downloads / Quick guides
In the download area we would like to provide you with important files that will support you in setting up intranet and internet presences of the LMU Klinikum.
This includes templates for image processing as well as documentation and Word templates, which we will make available to you for use over the course of time.
You are welcome to send us your suggestions on what you would like to find here in the future at any time via our e-mail contact address.
Image material
KLIBS (Clinic - Internet image collection)
Existing images
Images purchased by the LMU Klinikum from iStock can be downloaded and used on the LMU Klinikum intranet under S:\MIT-KUM-Internet-Bilder\KLIBS\iStock . The image copyrights and the rights to one's own image have been clarified for these images and the images can be used as desired
The purpose of this file storage is that the images purchased by the hospital may and should be used by employees at the hospital for business purposes.
New images
The web editors of the authoring systems WCMS-Fiona and WCMS-Scrivito can select image IDs for the production of header images (and only for this purpose!) at http://www.istockphoto.com/photo and order them via the support e-mail address of the project "New Technologies Internet Intranet for LMU Klinikum Web Presence".
If other institutions of the hospital also buy or have bought iStock contingents, it would make sense to store the purchased images here for the LMU Hospital as well and to make multiple use of them.
If you are in favor of this, please also send your purchased images, which have been cleared in terms of copyright and rights to your own image, to our support e-mail address.
Miscellaneous
- Word template on image copyright
- Word template on the rights to your own image
- Adobe ICC profiles (including RGB for integration in GIMP)
- ECI profiles 1.0 (including RGB for integration in GIMP)
- ECI profiles 2.0 (including RGB for integration in GIMP)
- Plugin for GIMP 2.6.6 (image export for the web)
- Gimp installation file (setup)
- PDF Accessibility Checker
Quick guides
At this point we would like to provide you with useful support for setting up and editing websites in the WCMS Fiona of the LMU Klinikum (CMS-Fiona).
WCMS Fiona input wizard Intranet
Operational messages
valid in the "INTRAnet Fiona authoring system"
"To be able to create operating messages, you must be entered in the group of authorized users. To do this, please send an e-mail to our support team."
1 - Registration
... with HELIOS ID from the "New Technologies Internet Intranet" project website
2 - Creation of a new establishment notification
A new operating message is created using the input wizard. After logging in, the wizard can be called up once or several times.

3 - Input page start and end time of the establishment notification
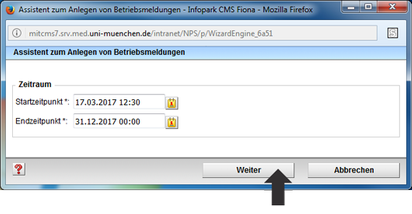
4 - Filling in the data fields
Fields marked with an asterisk are mandatory and must be completed. The other input fields are optional.
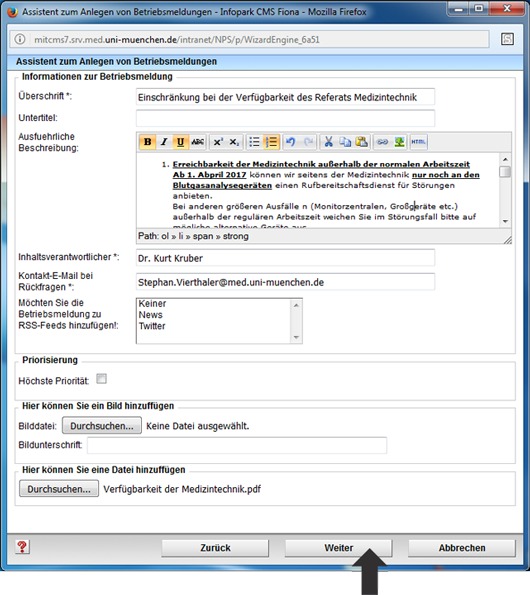
5 - Preview page
Click "Next" to go to the preview page
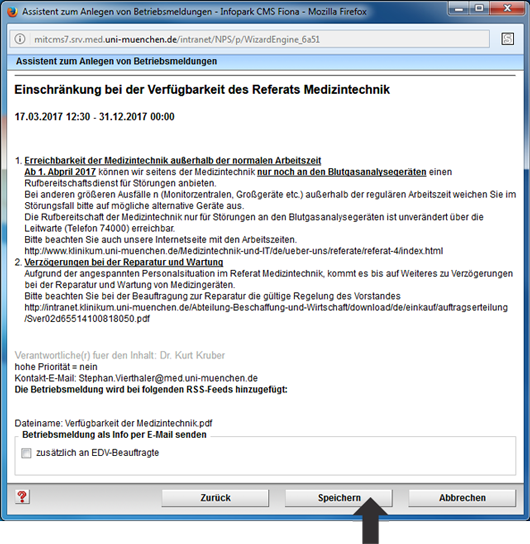
NOTE
Please note that only by using the entry wizard will the entry automatically be visible live in approx. 1 hour.
6 - Log out
When you have finished working with the assistant, please log out.

valid in the "INTRAnet Fiona authoring system"
"To be able to edit operating messages, you must be entered in the group of authorized users. To do this, please send an e-mail to our support team."
1 - Login
... with HELIOS ID from the "New Technologies Internet Intranet" project website
2 - Editing an operation notification
An existing operating message is processed with the input wizard.

3 - Selecting the operation notification
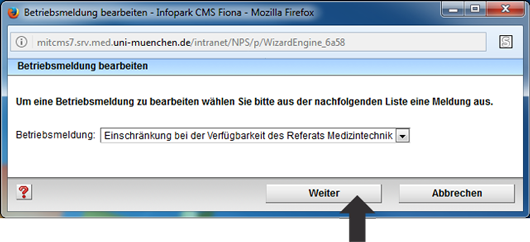
4 - Input page
Edit all relevant information
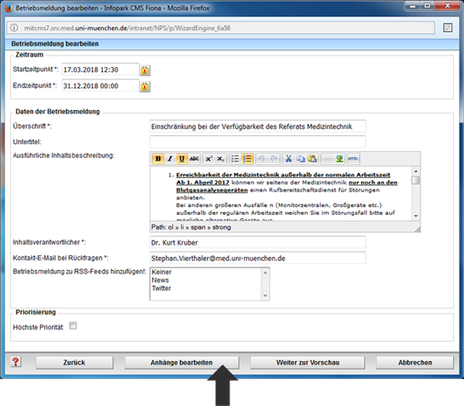
5 - Change or delete download
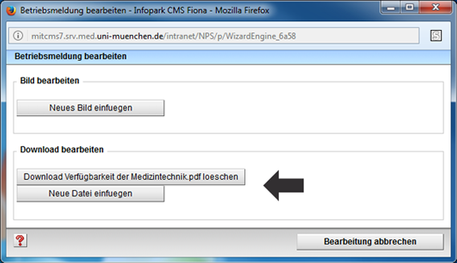
6 - Input page
Edit all relevant information

7 - Change or delete download

e.g. delete download
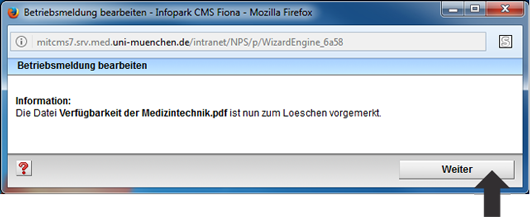
Click "Next" to return to the page with the input fields.
8 - Preview page
Click "Next" to go to the preview page.
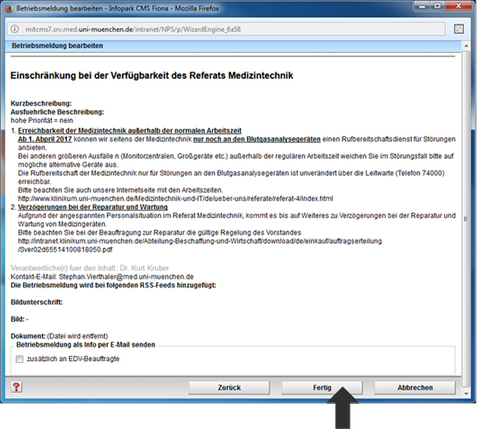
At the end of data entry, click the "Done" button and then "OK".
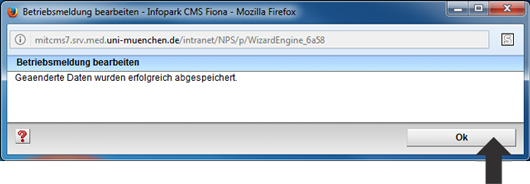
9 - Finished view of the operating message
The edited, entered operating message is displayed in the list view.

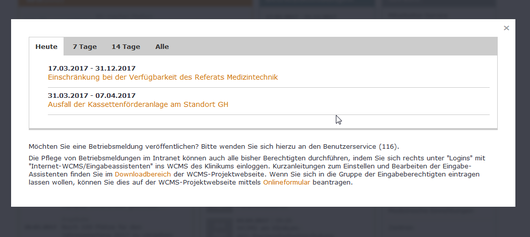
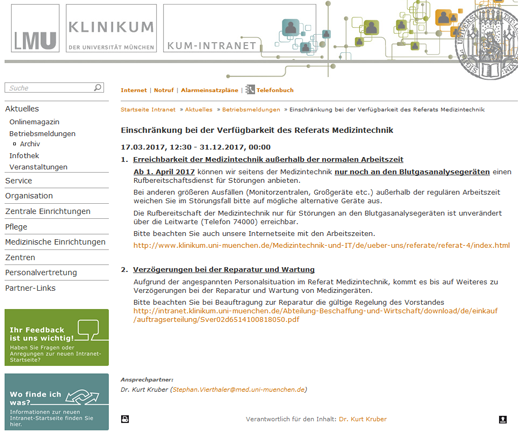
Clicking on the heading takes you to the detailed view of the operating message.
NOTE
Please note that only by using the entry wizard will the entry automatically be visible live in approx. 1 hour.
10 - Log out
When you have finished working with the assistant, please log out.

Infothek messages
valid in the "INTRAnet Fiona authoring system"
"To be able to create Infothek messages, you must be entered in the group of authorized users. To do this, please send an e-mail to our support team."
1 - Log in
... with HELIOS ID from the "New Technologies Internet Intranet" project website
2 - Creating a new notification in the Infothek
A new notification is created with the input wizard. After logging in, the wizard can be called up once or several times.

3 - Filling in the data fields
Fields marked with an asterisk are mandatory. The other input fields are optional.

NOTE
The Infothek is divided into 4 categories. These are
- Absences
- offers
- Calls
- Notes
Please note that each message must be assigned to a category.
4 - Input page
Edit all relevant information
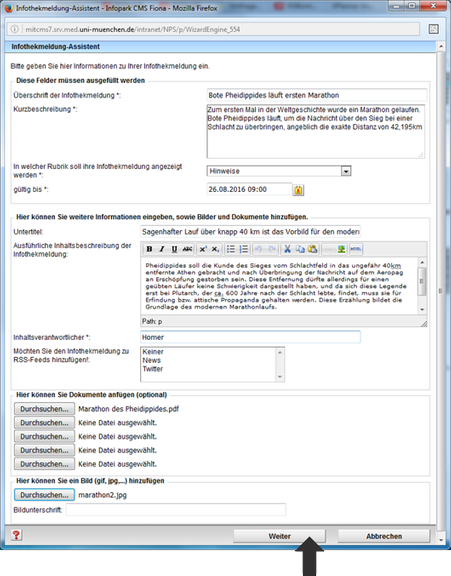
5 - Preview page
Click "Next" to go to the preview page.
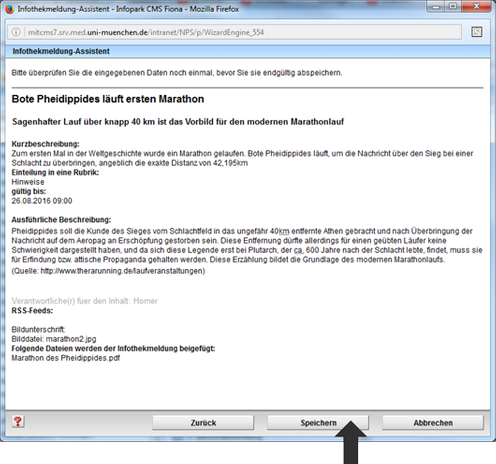
6 - Back to the input page
If necessary, you can use the "Back" button to return from the preview page to the input page.
At the end of data entry, click the "Save" button and then "OK" to finish.

7 - Finished view of the notification in overview
The newly entered message is displayed in the Infothek box.
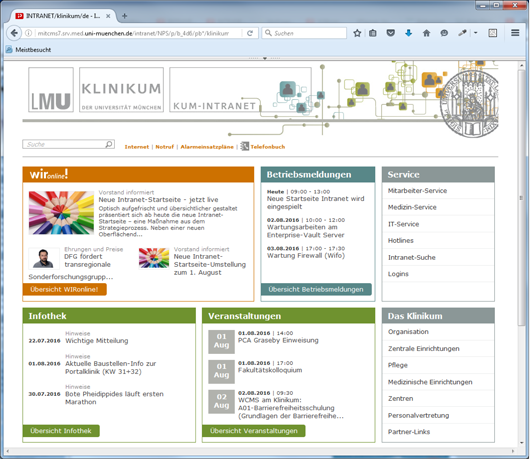
8 - Detailed view of the notification
Click "Next" to go to the preview page.
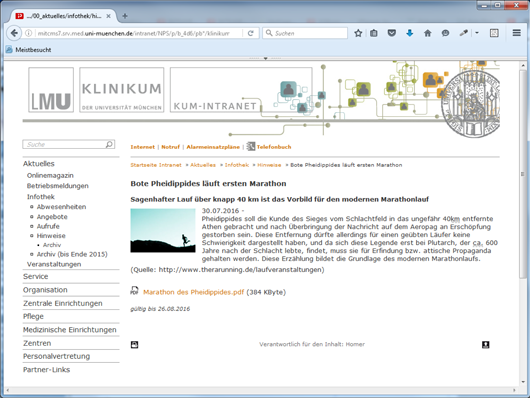
At the end of data entry, click the "Done" button and then "OK".

NOTE
Please note that only by using the entry wizard will the entry automatically be visible live in approx. 1 hour.
9 - Log out
When you have finished working with the assistant, please log out.

valid in the "INTRAnet Fiona authoring system"
"To be able to edit Infothek messages, you must be entered in the group of authorized users. To do this, please send an e-mail to our support team."
1 - Login
... with HELIOS ID from the "New Technologies Internet Intranet" project website
2 - Editing a notification in the Infothek
An existing message is processed with the input wizard.

NOTE
The Infothek is divided into 4 categories. These are
- Absences
- offers
- Calls
- Notes
Please note that each message must be assigned to a category.
3 - Selecting the notification
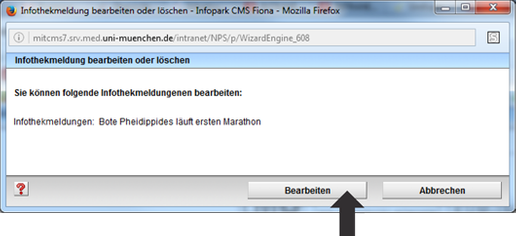
4 - Input page
Processing of all relevant information.
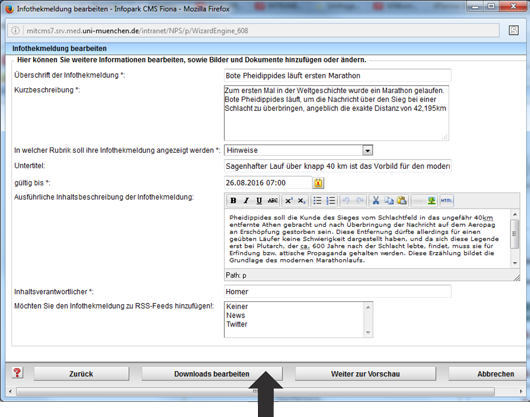
5 - Download, change or delete image
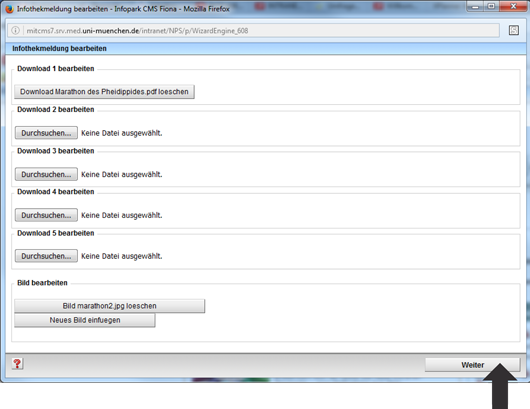
z. E.g. delete image
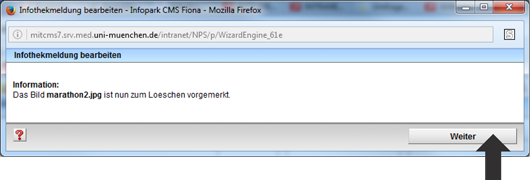
Click "Next" to return to the input page.
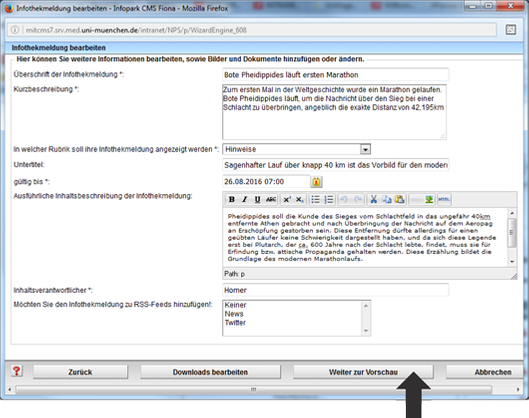
6 - Preview page
Click "Continue to preview" to go to the preview page.

e.g. delete download

Click "Next" to return to the page with the input fields.
7 - Preview page
Click "Next" to go to the preview page.

At the end of data entry, click the "Done" button and then "OK".

8 - Finished view of the notification
The edited, entered message is displayed in the list view.

At the end of data entry, click the "Done" button and then "OK".

9 - Finished view of the message
The edited, entered message is displayed in the Infothek box.

Clicking on the headline takes you to the detailed view of the message.
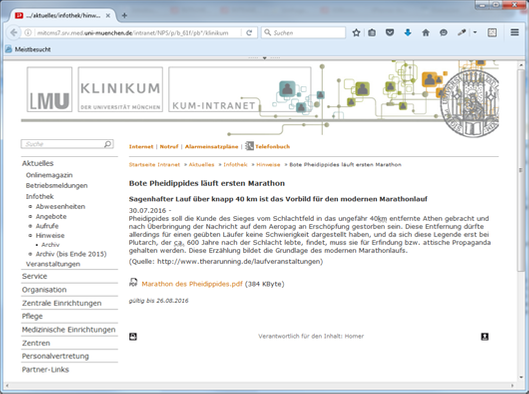
NOTE
Please note that only by using the entry wizard will the entry automatically be visible live in approx. 1 hour.
10 - Deregister
When you have finished working with the assistant, please log out.

events
valid in the "INTRAnet Fiona authoring system"
"To be able to create events, you must be entered in the group of authorized users. To do this, please send an e-mail to our support team."
1 - Registration
... with HELIOS ID from the "New Technologies Internet Intranet" project website
2 - Creating a new event
A new event is created using the entry wizard. After logging in, the wizard can be called up once or several times.

3 - Filling in the data fields
Fields marked with an asterisk are mandatory. The other input fields are optional.

NOTE
Enter all relevant information. There are two types of events:
- Individual events
- Series of events
4 - Input page
Edit all relevant information
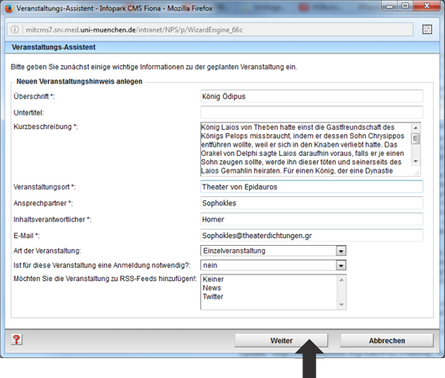
Click "Next" to go to the next input page.
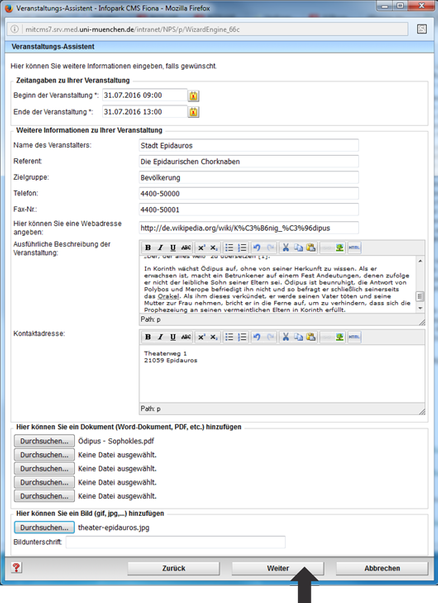
5 - Preview page (individual event)
Click "Next" to go to the preview page.
If required, the "Back" button takes you from the preview page to the input page.
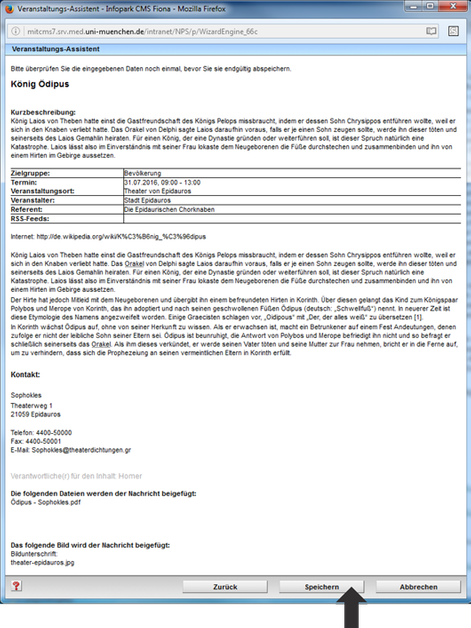
At the end of the data entry, click on the "Save" button and then on "OK".
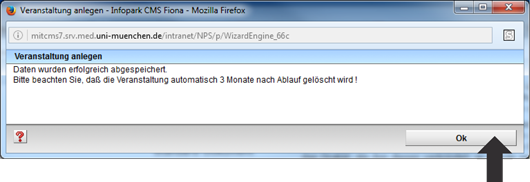
6 - Finished view of the event
The newly entered event is displayed in the list view.
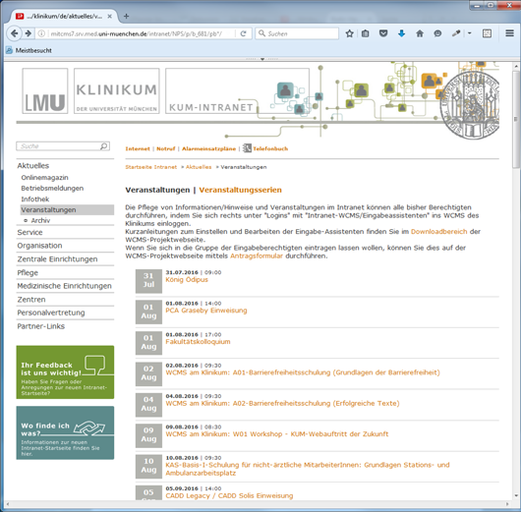
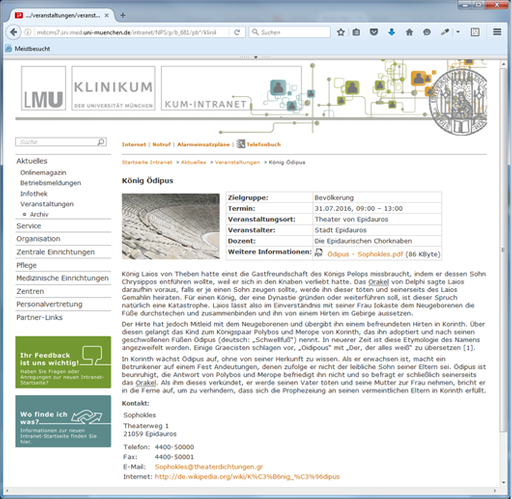
Clicking on the headline will take you to the detailed view of the event.
NOTE
Please note that only by using the entry wizard will the entry automatically be visible live in approx. 1 hour.
Please note that the entry will be automatically deleted 3 months after the end of the event.
7 - Deregister
When you have finished working with the assistant, please log out.

valid in the "INTRAnet Fiona authoring system"
"To be able to edit events, you must be entered in the group of authorized users. To do this, please send an e-mail to our support team."
1 - Registration
... with HELIOS ID from the WCMS project website "New Technologies Internet Intranet"
2 - Editing an event in the Infothek
An existing event is edited with the input assistant.

3 - Selecting the event
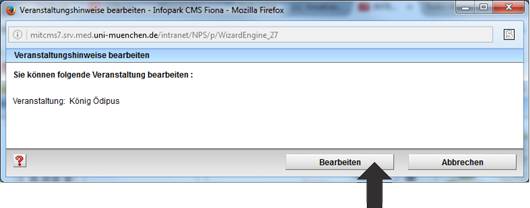
4 - Input page
Processing of all relevant information.
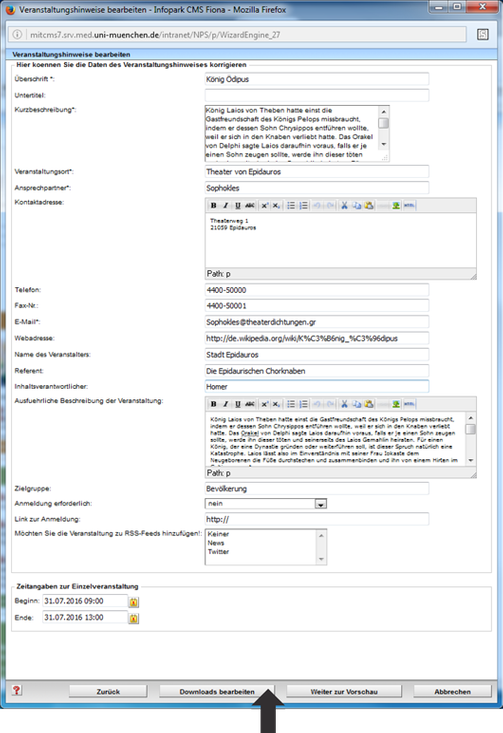
4 - Download, change or delete image
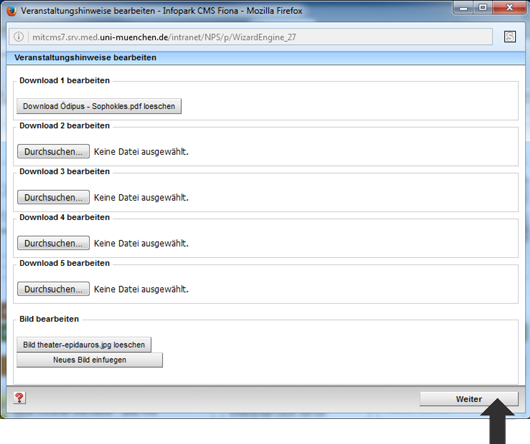
e.g. delete image
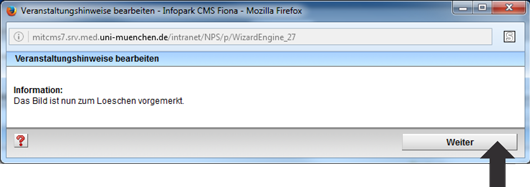
5 - Back on the entry page

6 - Preview page (single event)
Click "Next" to go to the preview page.
If required, the "Back" button takes you from the preview page to the input page.

At the end of the data entry, click on the "Save" button and then on "OK".

7 - Finished view of the event
The edited, entered event is displayed in the list view.
The following illustrations show the list view and the complete view.

Clicking on the headline will take you to the detailed view of the event.

NOTE
Please note that only by using the entry wizard will the entry automatically be visible live in approx. 1 hour.
Please note that the entry will be automatically deleted 3 months after the end of the event.
8 - Log out
When you have finished working with the assistant, please log out.

Menu plan
valid in the "INTRAnet Fiona authoring system"
1 - Registration
... with HELIOS ID from the "New Technologies Internet Intranet" project website
2 - Creating a new meal plan
A new meal plan is created using the input wizard. After logging in, the assistant can be called up once or several times.

3 - Input page
Enter all relevant information.
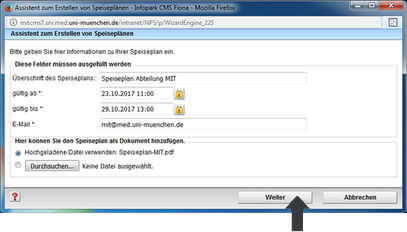
4 - Preview page
Click "Next" to go to the preview page.
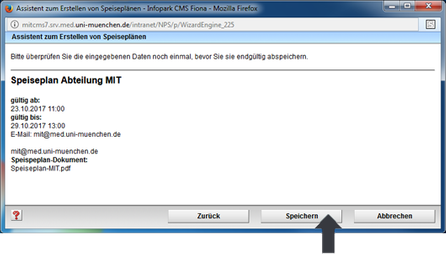
At the end of the data entry, click on the "Save" button and then on "OK".

The newly entered meal plan is displayed in the list view.
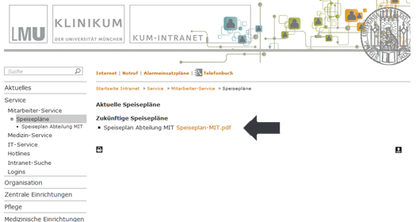
NOTE
Please note that only by using the input assistant will the entry automatically be visible live in approx. 1 hour.
Please note that the menu will be automatically deleted 3 months after it expires.
5 - Log out
When you have finished working with the assistant, please log out.

valid in the "INTRAnet Fiona authoring system"
1 - Log in
... with HELIOS ID from the "New Technologies Internet Intranet" project website
2 - Editing the menu
An existing meal plan is edited with the input assistant.

3 - Selecting the meal plan
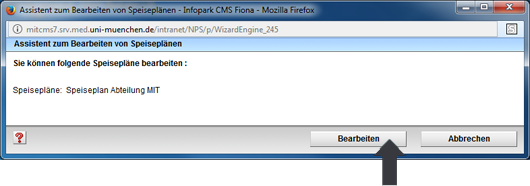
4 - Input page
Processing of all relevant information.
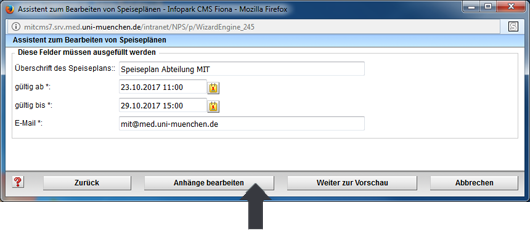
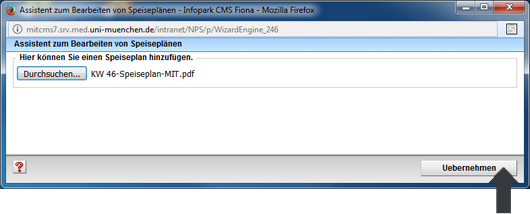
4 - Edit attachment

Select new PDF from hard disk
5 - Back on the input page

6 - Preview page
Click "Continue to preview" to go to the preview page.
If required, the "Back" button takes you from the preview page to the input page.
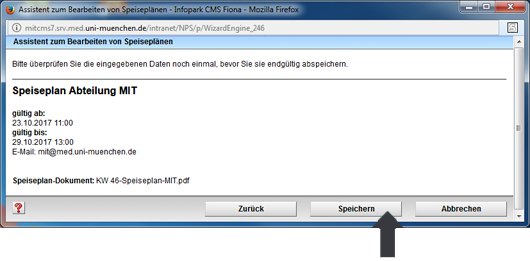
At the end of the data entry, click on the "Save" button and then on "OK".

7 - Finished view of the entered meal plan
The edited, entered meal plan is displayed in the list view.

Click on the PDF to open the menu.
NOTE
Please note that only by using the entry assistant will the entry automatically be visible live in approx. 1 hour.
Please note that the menu will be automatically deleted 3 months after it expires.
8 - Log out
When you have finished working with the assistant, please log out.

WCMS template special case
video
valid in the "INTRAnet Fiona authoring system"
1 - Log in
... INTRAnet with HELIOS ID from the "New Technologies Internet Intranet" project website
or
... INTERnet from the project website "New Technologies Internet Intranet"
2 - Upload video
Videos are uploaded in the download folder. Path: xy-corepackage/download/en/[your download container]
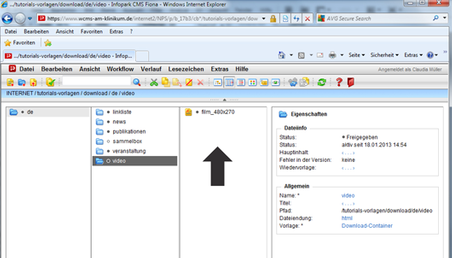
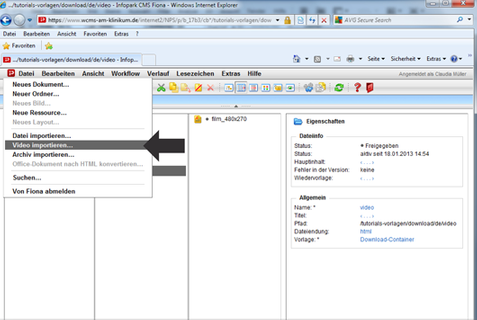
NOTE
Procedure: File > Import video
NOT File > Import file
REASON
With this procedure, videos are no longer stored in the system, but on a separate media server. This means that your videos load much faster on your website.
3 - Template video
Switch from the download folder to the de folder and then to the desired position where the video template is to be placed.
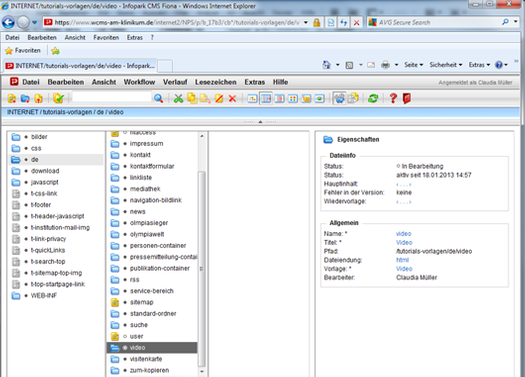
4 - Create video template
Either via the menu bar with "Create new folder" ...
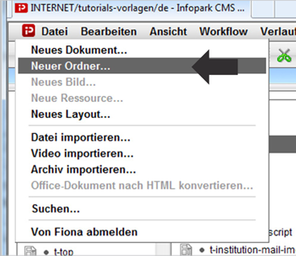
or...
...via the toolbar with the blue folder icon
5 - Input fields
Complete the input fields in the Display and Content field groups. Mandatory fields must be filled in!

At the end of data entry, click the "Save" button and then "OK".
4 - Finished view of the video template
Switch from the column view to the separate preview.
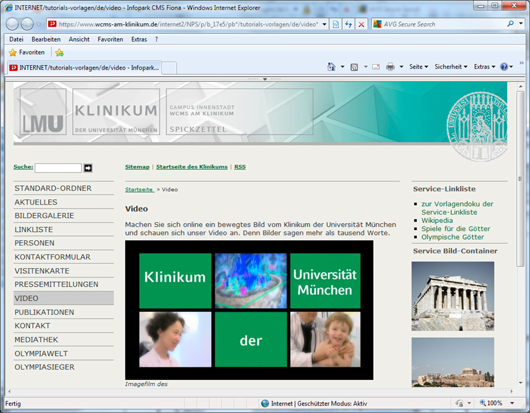
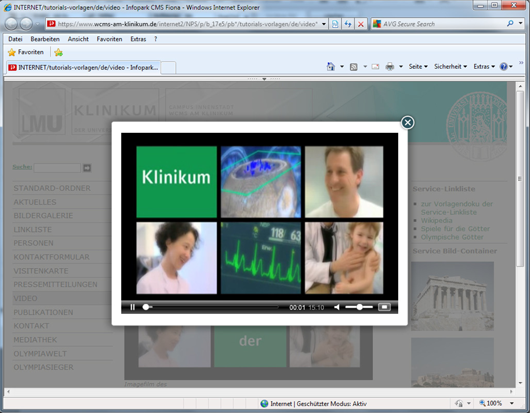
Click on the preview image to open the video in the player.
NOTE
Once the video template has been completed, it must also be released.
If a video is to be replaced, this cannot be done in the usual way using the "Replace" function when importing. The new video must also be uploaded using the "Import video" function. The path from the video template must be reset to the uploaded video. The old video can then be deleted.

